Post Name

Have you lost your Westfalia towbar key just before a long-planned trip or an important towing job? Don’t worry, you’re not alone. Every year, thousands of drivers face the same issue: the towbar key disappears right when it's needed most.

Westfalia detachable towbar keys are usually used only a few times per year – often for summer holidays, camping trips, towing, or moving. Because they are used so rarely, they often get forgotten for months. It's easy to lose track of where they were last placed: in the glove compartment, a drawer in the garage, or a coat pocket?

Fortunately, there's a simple solution – without having to replace the entire towbar system.

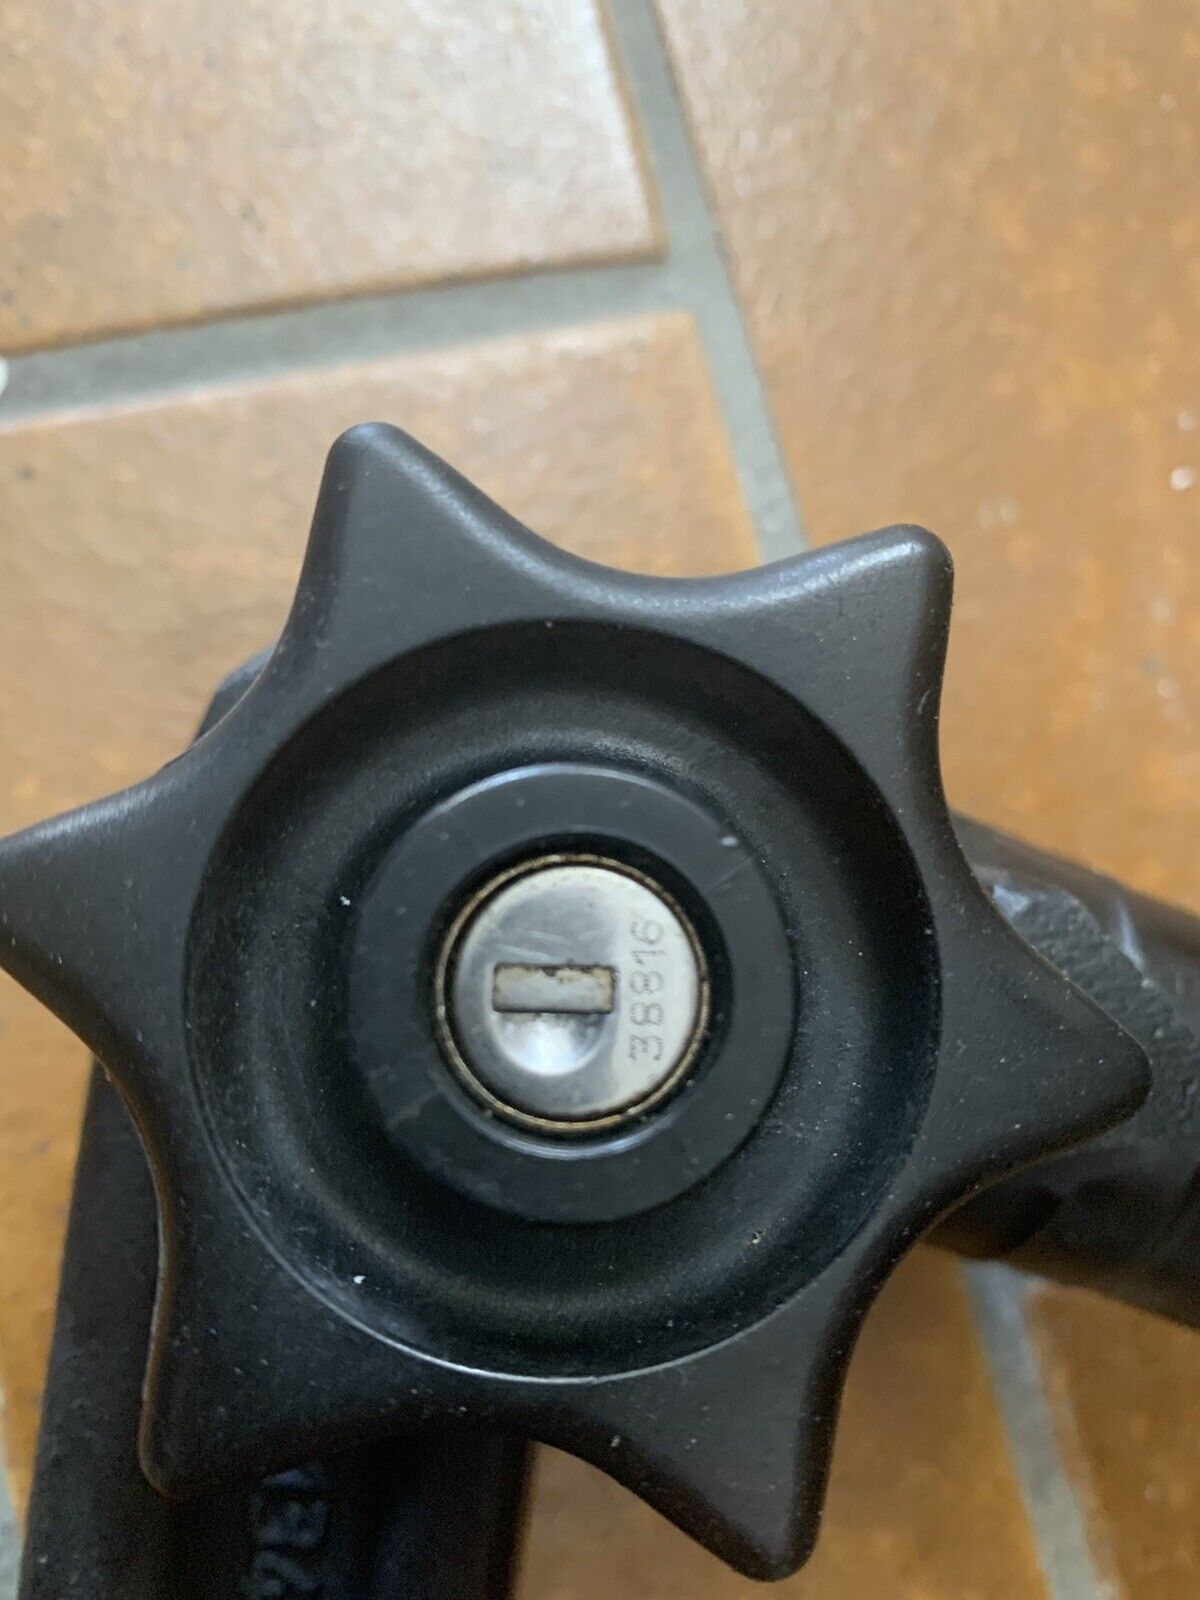
Step 1: Check the Lock Cylinder for a 5-Digit Code

Take a close look at the front of your Westfalia towbar lock, around the keyhole. Many models have a 5-digit code engraved directly into the metal.

If the code is between 20000 and 50000, it is your personal key code.

This code allows professional key services (like MR-KEY) to create a perfectly matched replacement key – without the original.

Examples of valid codes:

23456

27891

49821

You can enter this code directly into an online order form.

Order a replacement key here:

https://mr-key.com/cat/towbars-keys


What if You Only See 3 Digits?

Sometimes, you might only find a 3-digit number on the lock body (e.g., 104, 287). Unfortunately, these numbers are not valid key codes. They usually refer to batch numbers or internal components.

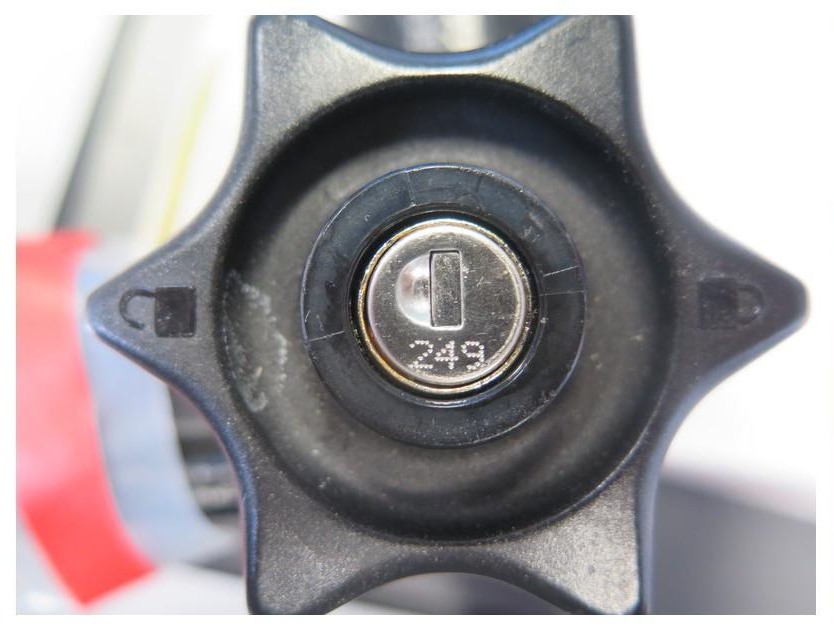
In this case, we recommend:

Conducting a thorough search for the original key (glove compartment, toolbox, jacket pockets, etc.)

If the key cannot be found, consider replacing the towbar locking mechanism


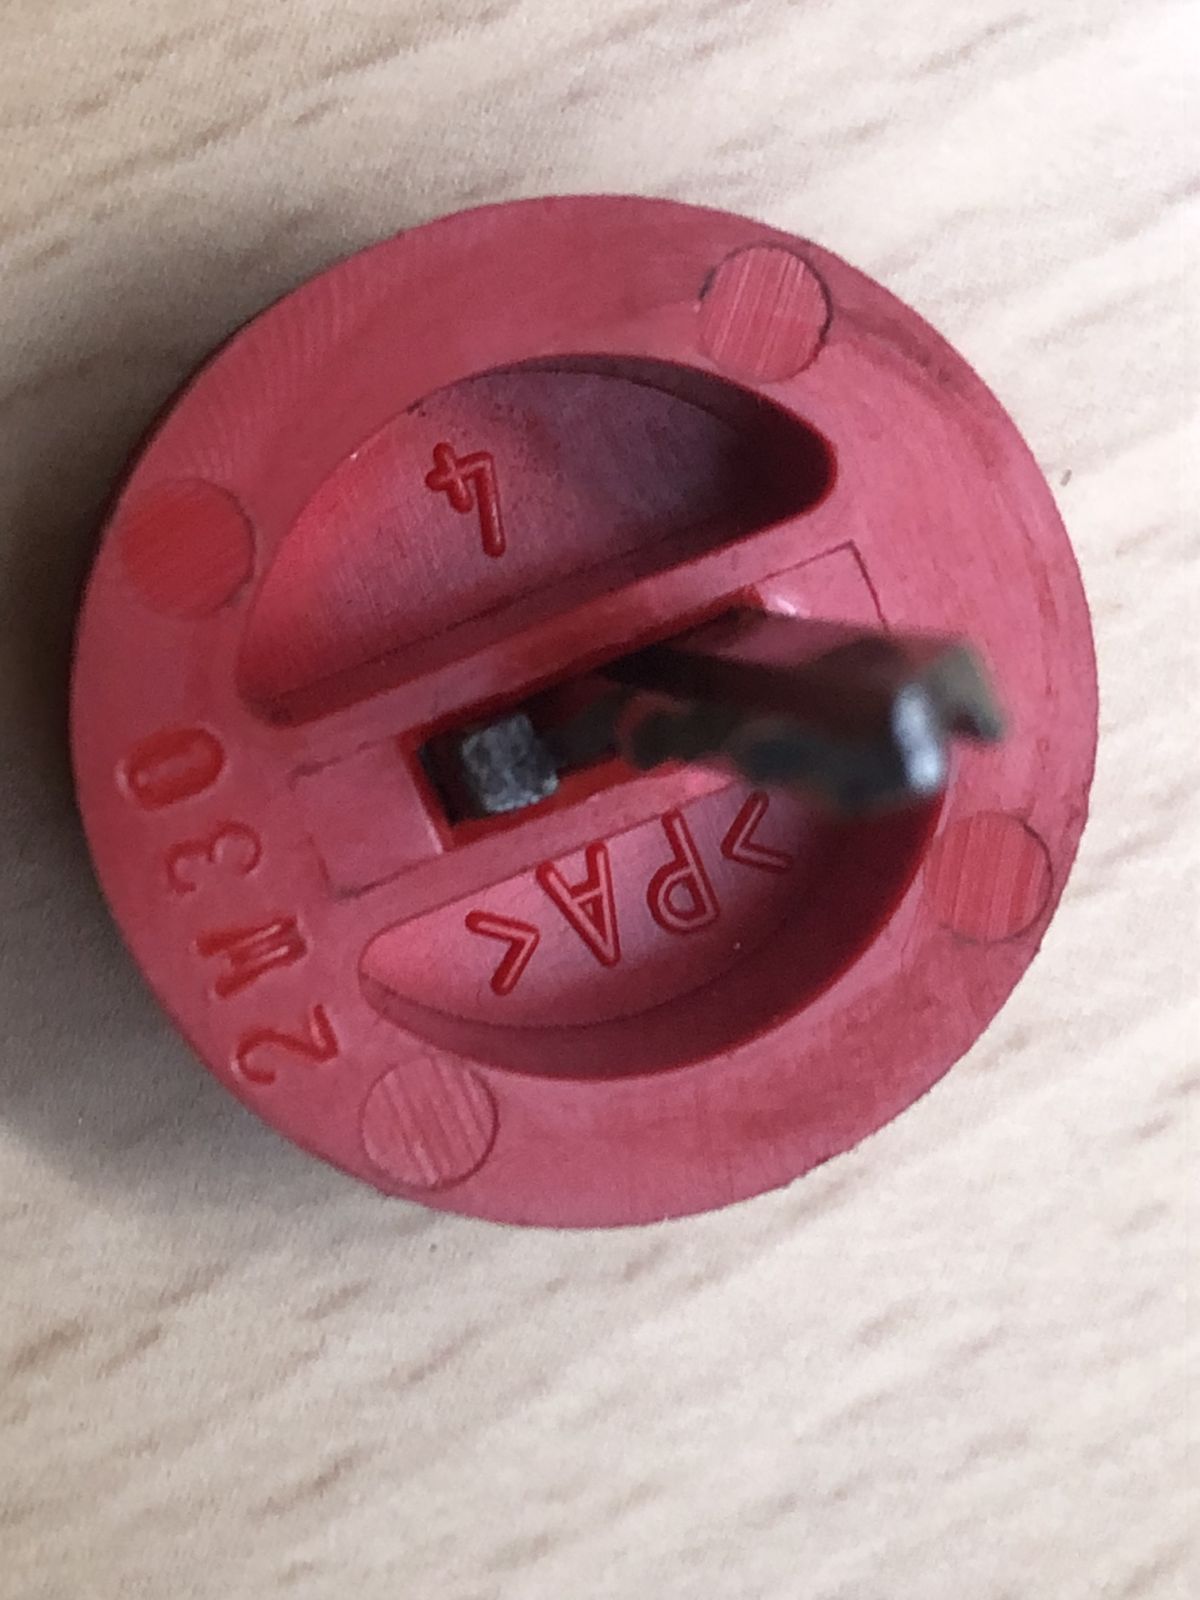
Tip: Make a Spare Key While You Still Can

If you still have your original Westfalia towbar key, now is the perfect time to make a copy.

Many Westfalia keys show a code like: 2W01 to 2W50

This code is usually engraved on the metal shaft of the key and matches your towbar lock. With this code, we can quickly and affordably produce a precise duplicate.

Why make a spare key?

Avoid last-minute panic before departure

Reduce costs by preventing lock replacement

Fast delivery when ordering by code

Order here: https://mr-key.com/cat/towbars-keys


Fast and Professional Westfalia Key Service

At MR-KEY, we specialize in duplicating Westfalia towbar keys by code. Our service is fast, precise, and hassle-free:

Simply provide the 5-digit lock code (20000–50000)

We cut the key using high-precision machines

Every key is checked before shipping

In most cases, shipping is completed within 24 hours.


Quick Overview

SituationCan a New Key Be Made?What to Do
5-digit code on the lock (20000–50000)YesOrder a key by code
Only 3-digit number on the lockNoSearch for the key or replace the lock
Original key with "2W" code presentYesHave a spare key made


Tips: How to Avoid Losing Your Key in the Future

To avoid ending up in this situation again, follow these simple tips:

Store your spare key in your vehicle documents folder or glove box

Label your keychain with "Towbar" for easy identification

Take a photo of your key code and save it on your phone or in the cloud

These small steps can save you time, stress, and money.


Losing your Westfalia towbar key doesn't have to ruin your travel plans. As long as your lock has a valid 5-digit code between 20000 and 50000, a replacement key can be made and shipped quickly.

And if you still have the original key? Make a copy now – a small investment for long-term peace of mind.

Order your Westfalia replacement key now:
https://mr-key.com/cat/towbars-keys

Safe travels!

Related Posts

Simple and Affordable Solutions for Car Key Replacement and Repairs

Simple and Affordable Solutions for Car Key Replacement and Repairs

Misplacing or damaging your car keys can be a major inconvenience, but it doesn't have to be a costly ordeal. As a car owner seeking budget-friendly and efficient solutions, understanding your options is crucial. Here's a comprehensive guide to help you navigate the process of replacing your car keys without breaking the bank. Understanding Your Car Key Type Identifying the specific type of car key you have is the first step toward an effective replacement: Traditional Metal Keys : Simple, non-electronic keys that are easy and inexpensive to duplicate. Transponder Keys : Equipped with a chip that communicates with your vehicle's ignition system for added security. Remote Key Fobs : Allow remote locking and unlocking of your vehicle, often integrated with a transponder chip. Smart Keys : Provide keyless entry and start features, utilizing advanced technology for convenience. Cost-Effective Alternatives to Dealership Key Replacement Dealerships are known for charging premium prices for key replacements. Consider these more affordable options: Professional Locksmiths : Specialize in cutting and programming various types of car keys, often at a fraction of dealership costs. Online Key Retailers : Offer replacement keys and fobs that can be purchased and then programmed either by yourself or a professional. Hardware Stores : Some stores can duplicate traditional metal keys on the spot, providing a quick and inexpensive solution. Steps to Take When You've Lost Your Car Key Losing your car key can be stressful, but following these steps can streamline the replacement process: Verify Your Vehicle Identification Number (VIN) : Locate your VIN, typically found on the dashboard or inside the driver's side door, as it is essential for key replacement. Gather Necessary Documentation : Prepare proof of ownership, such as your vehicle registration and personal identification. Contact a Professional : Reach out to a reputable locksmith or key replacement service with your vehicle details to obtain a new key. Removing a Broken Key from the Ignition or Door Lock A broken key can be a frustrating obstacle. Here's how to address it: Use Needle-Nose Pliers : If a portion of the key is protruding, gently extract it using pliers. Apply Lubricant : Spray a graphite-based lubricant into the lock to ease the removal process. Seek Professional Assistance : If the key fragment is lodged deep or these methods fail, contact a locksmith to prevent further damage. Preventative Measures to Avoid Future Key Issues Keep a Spare Key : Having a duplicate stored safely can save time and money in emergencies. Regular Maintenance : Inspect your keys and locks periodically for signs of wear and address issues promptly. Use Key Protectors : Invest in key covers or cases to minimize physical damage.

How to Take the Perfect Photo of Your Key for Easy Replacement

How to Take the Perfect Photo of Your Key for Easy Replacement

When you need a replacement key , taking a clear, detailed photo of your key can make the process much faster and more accurate. A high-quality image helps key makers understand the exact specifications, cuts, and dimensions of your key, which is especially important if you don’t have a spare. In this guide, we’ll walk you through the best practices for photographing your key so you can get an accurate replacement with ease. Why a Clear Key Photo Matters Photographing a key might sound simple, but it requires a bit of attention to detail. A well-taken photo captures the key’s grooves and unique cuts clearly, helping the key cutter replicate the exact pattern. Saves Time : A high-quality photo reduces the need for multiple attempts to cut a new key . Ensures Accuracy : Clear images help capture specific details, leading to a more precise fit. Convenient Process : With just a smartphone and a few tips, you can photograph your key from home without needing special equipment. Essential Tools for Photographing Your Key To take a clear photo of your key, you don’t need much beyond a few household items. Here’s what you’ll need: Smartphone or Camera : A phone camera is usually sufficient, but a standard digital camera works well too. Plain Background : Choose a neutral, solid-colored background like a piece of white paper or a smooth table surface. Good Lighting : Natural daylight or a bright room light helps capture details without shadows. Small Object for Elevation : A coin or similar item can lift the key slightly, making it easier to photograph. Step-by-Step Guide to Taking the Perfect Key Photo Follow these steps to take a photo that ensures clarity and accuracy for key replacement. 1. Set Up the Background Place a piece of plain white paper or another smooth, light-colored surface under your key. The solid color helps the details of the key stand out without any visual distractions. Tip : Avoid backgrounds with patterns or textures, as these can obscure the key’s features. 2. Position the Key Correctly Lay the key flat on the background, with the grooves and cuts facing up. The key should be positioned horizontally to allow a clear view of all its details. Side Profile : Make sure to capture the side profile that shows the cuts and grooves. Elevate Slightly : Place a coin or small object under one end of the key to angle it slightly toward the camera. This can help reduce shadows and improve focus on the cuts. 3. Adjust Lighting Good lighting is essential for capturing details. If possible, photograph your key in natural daylight near a window or use a well-lit room. Avoid Shadows : Ensure that no shadows fall across the key, as they can obscure details. Diffuse Light : If using a lamp, consider placing a thin cloth over it to diffuse the light and reduce harsh reflections. 4. Focus and Zoom Make sure your camera or smartphone is focused directly on the key. You may need to tap the screen to bring it into sharp focus. Zoom in Carefully : If you’re using a smartphone, zoom in slightly to capture the details, but avoid over-zooming, which can blur the image. Test Multiple Angles : Sometimes a slight adjustment in angle can capture the cuts more effectively, so take a few shots from slightly different perspectives. 5. Capture Multiple Photos It’s always a good idea to take several photos to ensure you have the best one. Try different angles and lighting adjustments to capture as many details as possible. Close-Up of the Grooves : Take one close-up image focusing on the cuts and grooves of the key. Overall Image : Include one full-length photo that shows the entire key from end to end. Try Different Angles : Slightly tilt the key or move the camera to see which angle best captures the detail of the cuts. Common Mistakes to Avoid When Photographing Your Key To get the best results, steer clear of these common issues that can impact the quality of your key photo: Blurry Images : If your hand shakes, use a small tripod or prop your phone on a stable surface. Poor Lighting : Avoid taking photos in dim rooms; use bright light to ensure the key is clearly visible. Obstructed Details : Make sure the entire length of the key is visible, without any part being cut off or covered. Tips for Ensuring a Smooth Replacement Process Once you have a clear photo of your key, there are a few final steps to make the replacement process as efficient as possible. Check the Photos : Look over your photos before sending them to ensure that they’re clear and detailed. Label the Key : If you’re photographing multiple keys, label each one in the image or add a note to avoid confusion. Include Measurements : If possible, add the measurements of the key’s length and width in your notes for added accuracy. A clear, detailed photo of your key can save you time and effort when seeking a replacement. By following these simple steps, you’ll provide all the necessary details to ensure your new key is an accurate match. Remember, good lighting, focus, and capturing all the unique cuts are essential to achieving the best results. With these guidelines, you’re set to take a photo that will make your key replacement process smooth and hassle-free.

The Fascinating History of Car Safety Features: How Far We’ve Come to Keep You Safe

The Fascinating History of Car Safety Features: How Far We’ve Come to Keep You Safe

When you think about cars, what comes to mind? Speed, design, or maybe the feeling of freedom when you hit the open road? But there’s one crucial aspect of driving that you might not think about as much—safety. Cars today are safer than ever, thanks to decades of innovations and advancements. But how did we get here? Let’s dive into the history of car safety features and see just how far we’ve come to protect you and your loved ones on the road. The Early Days: A Lack of Safety Awareness Back in the early 1900s, cars were viewed as luxury items and status symbols. Safety wasn’t really a concern. Cars had no seat belts, no airbags, and certainly no crumple zones. People focused more on making vehicles go faster and look better than on keeping passengers safe. In those days, accidents were far more dangerous, often leading to severe injuries or fatalities. It wasn’t until the rise of car ownership in the 1920s and 1930s that people began to notice just how dangerous cars could be. The growing number of vehicles on the road led to more accidents, and the need for safety features became evident. The Invention of Seat Belts: The First Major Breakthrough Seat belts were one of the first car safety features to be introduced. But they didn’t become standard right away. In fact, the idea of a seat belt first appeared in the late 19th century, designed for use in airplanes, not cars. It wasn’t until the 1950s that the seat belt began to find its way into automobiles, thanks to Swedish engineer Nils Bohlin, who designed the three-point seat belt in 1959. Bohlin’s invention, which you still use today, was a game-changer. It saved countless lives and reduced serious injuries in crashes. Volvo was the first company to introduce the three-point seat belt in their vehicles, and soon after, other manufacturers followed suit. Airbags: A Revolutionary Step Forward As seat belts became more common, automakers started looking for additional ways to protect drivers and passengers. Enter the airbag. The airbag was initially developed in the 1950s, but it took decades of refinement before it became a standard feature in cars. The first production car equipped with an airbag was the 1973 Oldsmobile Toronado, but it wasn’t until the 1990s that airbags became widely available. Today, airbags are a critical component of vehicle safety systems, with front, side, and even curtain airbags designed to protect you from all angles in a crash. Alongside seat belts, airbags are now seen as one of the most effective life-saving technologies in modern vehicles. Crumple Zones: Protecting You in a Collision Crumple zones are another innovation that may not be immediately obvious, but they play a huge role in keeping you safe. In the event of a crash, crumple zones are designed to absorb and dissipate energy, reducing the force transferred to passengers. Introduced in the 1950s by Mercedes-Benz, crumple zones help reduce the impact of a collision by sacrificing the car’s body to protect the occupants. Today, crumple zones are standard in virtually every car, and their design continues to evolve, improving crash safety with each new model year. Anti-lock Brakes: Helping You Keep Control The introduction of anti-lock braking systems (ABS) in the 1970s was another massive leap forward in car safety. ABS prevents the wheels from locking up during braking, which helps maintain steering control during an emergency stop. This system is especially useful on slippery surfaces like rain-soaked or icy roads. Before ABS, sudden braking could lead to skidding, causing drivers to lose control of their vehicles. ABS has significantly reduced the number of accidents caused by loss of control and has become a staple of modern driving safety. Electronic Stability Control: The Technology That Saves Lives Electronic Stability Control (ESC) was a groundbreaking safety feature that hit the market in the 1990s. ESC helps you maintain control of your car during skids or oversteering by automatically applying brakes to individual wheels. Studies have shown that ESC can reduce the risk of a fatal crash by as much as 50%. In fact, the National Highway Traffic Safety Administration (NHTSA) now mandates that all cars sold in the United States come equipped with ESC. This technology has proven to be especially helpful in preventing rollovers, which are among the most dangerous types of accidents. The Future of Car Safety: What’s Next? Car safety features have come a long way, but we’re not done yet. The future of vehicle safety lies in advanced driver-assistance systems (ADAS), which use sensors, cameras, and radar to detect potential hazards and prevent accidents before they happen. Some of the technologies that are becoming increasingly common include lane departure warnings, automatic emergency braking, and adaptive cruise control. And let’s not forget the promise of self-driving cars, which could drastically reduce accidents caused by human error, which accounts for the majority of crashes today. The Importance of Car Safety As we look back on the history of car safety features, it’s incredible to see how far we’ve come. From the early days of no seat belts or airbags to today’s cutting-edge technology, the automotive industry has made safety a top priority. The next time you get behind the wheel, take a moment to appreciate all the safety features designed to protect you. Whether it’s a simple seat belt or a high-tech stability control system, these innovations have made driving safer for everyone. And remember, no matter how advanced your car’s safety systems are, the best protection is still responsible driving. Stay alert, drive safely, and always buckle up!

How to Clean and Maintain Your Car Key Fob Like a Pro

How to Clean and Maintain Your Car Key Fob Like a Pro

Your car key fob is one of the most used items in your daily life. You press it multiple times a day, carry it in your pocket or bag, toss it on desks, and sometimes accidentally drop it on the ground. But how often do you actually clean or check it? Most people only think about their key fob when it stops working. By then, it's often too late. The good news is, with a little attention and regular maintenance, you can keep your car key fob working perfectly for years to come. In this article, you'll learn how to clean and maintain your car key fob like a pro — so you can save money, avoid frustration, and get the best performance out of your key. Why Cleaning and Maintaining Your Key Fob Matters Car key fobs aren’t just simple remotes. They're packed with sensitive electronics, small batteries, and tiny contact points that can easily get damaged by dirt, moisture, or simple neglect. If you never clean or check your key fob, you might start to notice: Unresponsive buttons Reduced signal range Frequent battery issues Complete failure to unlock or start the car Most of these problems are avoidable with basic maintenance . Cleaning your key fob regularly helps keep it functional, protects its electronics, and ensures it lasts longer. It also saves you from spending money on costly repairs or total key replacements. How to Clean Your Car Key Fob: Step-by-Step Guide Step 1: Open the Key Fob Gently Start by carefully opening your key fob. Most models have a small groove or notch where you can insert a flathead screwdriver or a coin to separate the shell. Be gentle — forcing it open can crack the plastic or damage internal clips. If you're unsure, check your car’s manual or look up your key model online to find specific instructions. Step 2: Remove the Battery Once you open the key fob, always remove the battery before cleaning. This protects the electronic circuit from any accidental moisture and prevents short-circuiting. Set the battery aside in a dry, safe place. Step 3: Clean the Exterior Use a soft, dry microfiber cloth to wipe the outside of the key fob shell. For tougher dirt or sticky areas, slightly dampen the cloth with water or isopropyl alcohol (70% or higher). Avoid using harsh cleaning chemicals that could damage the plastic or remove painted symbols. Step 4: Clean the Buttons and Small Gaps Dirt, dust, and pocket debris often collect around the buttons. These particles can block the buttons from making proper contact or cause them to stick. Use a cotton swab or a soft toothbrush to gently clean around the edges and in between the buttons. For tight spaces, a toothpick can help dislodge stubborn dirt. If needed, lightly moisten the cotton swab with alcohol to break down grime. Always dry the key fob thoroughly after cleaning. Step 5: Inspect and Clean the Battery Contacts Battery contacts can become dirty or corroded over time, especially if the battery leaked or moisture got inside. Check the metal contact points carefully. If you see white powder or greenish residue (common signs of corrosion), gently clean them using a cotton swab dipped in isopropyl alcohol. Be extremely careful not to bend or scratch the contacts. If corrosion is too severe, the key fob might need professional repair or a replacement circuit board. Step 6: Replace the Battery if Needed Key fob batteries typically last between 1 to 2 years, but frequent use, weak signals, or exposure to extreme temperatures can shorten battery life. If your battery is old or low, replace it with a new one. Most car key fobs use CR2032 or CR2025 batteries. Always make sure you install the new battery in the correct position, respecting the polarity (+ / -). A fresh battery not only improves response time but also ensures the signal reaches your car reliably. Step 7: Reassemble the Key Fob Once everything is clean and fully dry, carefully snap the key fob back together. Make sure the casing is securely closed and the buttons feel smooth and responsive. Test the key fob to confirm that it works correctly. Pro Tips to Keep Your Car Key Fob in Top Shape A well-maintained key fob can last many years. Here’s how to keep it working perfectly: Keep it Dry: Most key fobs aren’t waterproof. Avoid rain, puddles, wet pockets, or any contact with liquids. Use a Protective Cover: A silicone or rubber key cover adds shock protection, keeps out dirt, and prevents scratches. Avoid Extreme Heat or Cold: Leaving your key fob in direct sunlight or in a freezing car can damage the battery and weaken plastic parts. Change the Battery Regularly: Don’t wait for your key fob to completely stop working. Weak batteries can lead to unreliable signals and unexpected failure. Don’t Drop It: Even though most key fobs can handle light drops, repeated impact can cause internal damage. When to Replace the Key Fob Shell If your key fob shell is cracked, worn, or no longer closes tightly, it’s time to replace it. A damaged shell can let moisture and dirt reach the electronics and cause long-term damage. Replacing the shell is a quick and affordable solution that can extend your key fob’s life significantly. At Mr. Key , we offer high-quality key fob shells, batteries, and repair kits that can help you refresh your key fob and save money compared to dealership prices. Explore our key fob repair kits, protective covers, and replacement batteries now at mr-key.com . Your car key fob may seem like a small detail, but it plays a huge role in your daily life. Without it, you can’t get in or even start your car. The good news is that taking care of your key fob is easy. With regular cleaning, battery checks, and some simple maintenance, you can keep it working reliably for years. And if you need to replace your battery, your key shell, or your entire key fob, Mr. Key is here to help. We provide everything you need to keep your keys in perfect shape, save money, and avoid unnecessary trips to the dealer.

Chat with us